
Project Design Gallery Wall Part II, The Guts…

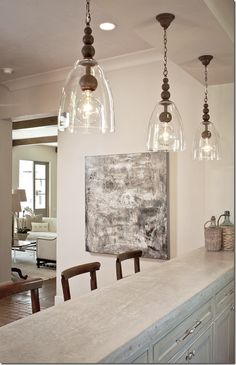
Well by now you have all checked out our amazing participants. You know they are going to have some fabulous examples next week for us all to enjoy! This week we all want to tell you about our spaces and what we plan to do with them. Right out of the chute I will tell you I cheated. I was super busy work wise when Maryann and I dreamed this up so I threw together a gallery wall in the guest room that I did for the ORC linking party last year. I have a blank wall in my hallway that I have been wanting to do a photo gallery wall but I wasn’t sure if I would have time to complete for Project Design. Guess what I did find the time so I am going to tell you about both projects. The Gallery Wall in the guest bedroom is the kind of Gallery Wall I have in other parts of my homes. The one I am working on in the hall is more of a departure for me. I will begin with describing the specifics of the bedroom (cheater) gallery wall. I found this painting (if you follow me on Instagram you saw it) that just captivated me.

This sweet boy was the inspiration for this space in the guest room. I am sorry since this is my “cheater” gallery wall you will have to bear with me. I literally threw this one together not knowing whether I would leave it or not. I used a mirror that I already had above this chest that was in the center of the wall.

and chairs that I already had… on each side..this one on the right

and this one on the left. The chairs are low so the wall just kind of looked unadorned if you know what I mean?

Hopefully you can get the visual. I had originally planned to use a vintage oil I already owned above one chair and the beautiful boy above the other chair. Then I got the cockamamie idea to do a gallery wall. If you aren’t already totally confused I will show you the finished product next week. I only used things I already owned for this venture which is what I normally do in my own home .
Now back to the gallery wall that I have been avoiding forever…I am not all that great with keeping photographs current so that is why I kept shying away from this blank wall. Since I painted my walls white and stained the floors dark the hallway really needed something on that darn wall!! The doorway on the left goes into the above said guestroom. The doorway at the end goes into our master bedroom. I can’t show anything to the left because it was photographed for Tuscan Style (I will keep you posted on that one). As you can see there are a couple of issues #l the switch right smack dab in the middle (one of the reasons I have been avoiding this) and the fact that this hallway is only 45 inches wide. My husband said “I never do hallways less than 48” wide (well guess what when we built this house we were poor ). Hence everything on this wall has to be flat!! No shelves or protruding objects!!

After Maryann left and made me feel extremely inadequate when she described what she was doing I thought to myself…I CAN DO THIS!!! I found this great mirror (a RH knockoff) at Aaron Brothers…and the wheels started turning…

Sadly I am sort of a frame hoarder so I had several of these in varying sizes that I had never used. If you notice the one on the right is from the now defunct Home Expo. The frame on the right echos the dark color of the floors while the frame in the middle and the left repeats the grained look of a stack of boxes at the end of the hall (that I cannot show you).

The wall is twelve feet long ample space for a gallery wall. However since the hall is narrow, I think it is important to keep the design simple. There is nothing worse than feeling a narrow hallway close in on you. Fortunately I have a builder husband who is extremely precise. When doing a gallery wall if I have a large center piece (ie the mirror) I build from there. I normally lay everything out on the floor before I begin and leave the measuring up to the pro. Of course if you don’t have a resident pro, cutting your pieces out with paper first and attaching them to the wall with painters tape works wonders. If I were doing this for a client I would do it like this. You can put your nail hole through the paper and voila no extra nail holes to fill!

via lifehacker
The mirror from Aaron Brothers provided the color theme In this case I kept all the frames in black, brown, and gold tones for continuity. So there you have my simple plan. Now stop by all of our other participants and see what they are up to. I know I can’t wait!


Hi, nice site you have here! Keep up the excellent work!
<a href="http://www.smsideatechnosolutions.com/odisha/cuttack/bulk-sms.html>Premium Sms Provider In Cuttack</a>
I love your frames and your mirror….I forgot about Aaron Brothers! I wish they had those stores on the East Coast. Can't wait to see how this all comes together!
Love the CHEST!!!
Yes, he would have to hang that mirror on a STUD!Then measure the back of the mirror to the wire, ETC ETC ETC……….DrIves me CRAZY!I live with one TOO!
You must come over and comment on my shawl………….and be introduced to my new friend in PARIS!
Would love to meet one day!! Sounds like fun!!
Okay, can I just use one of yours for mine??? (Since you know, you have a cheater wall in stand-by mode and we are off buying wood floors for ANOTHER project tonight???) Talk about an over achiever! Good grief girl. I am in love with that middle frame. How gorgeous! One day I will show all the frames I have saved through the years (they fill an entire closet) and you will not believe the quantity…perhaps I could open a framing shop when I retire. Can't wait to see both of your walls!
Home Expo! Didn't that close like 10 years ago:) Now you got me worried….ha ha. I am thoroughly confused [it doesn't take much] so I will just wait until next week to see everything unfold!
Well you are all making me for inadequate!! Love seeing and hearing all the wonderful details though!
Xoxo
Karena
The Arts by Karena
two for one!!! what a SHOW-OFF! 🙂
there is another person out there that hordes frames??? needed to frame something for my mom yesterday and off to my frame closet, viola.
cannot wait cindy…..everything you do is spectacular
debra
HAHAHAHA! I made YOU feel inadequate??? NO way! Your existing gallery wall with the sweet little boy is amazing and I can't wait to see it here again and pin it!! Great idea about a mirror in that space.
A cheater wall, that's funny. Sounds like something I'd do. I'm excited to see what you do in the hallway, I never really know how to decorate there. I do worry about that 'closed in' feeling but that's because our hallways have always been the standard width (ie too narrow for me). Love that Aaron Bros mirror, they have some good stuff. And I'm so glad you get to use those darn frames…finally! 🙂
So glad that this Project Design series gave you the motivation that you needed to power through and work on your hall gallery – you'll be so glad that you got it done! I just can't wait to see your new one in the hall (love those frames!) as well as your "cheater wall" 🙂