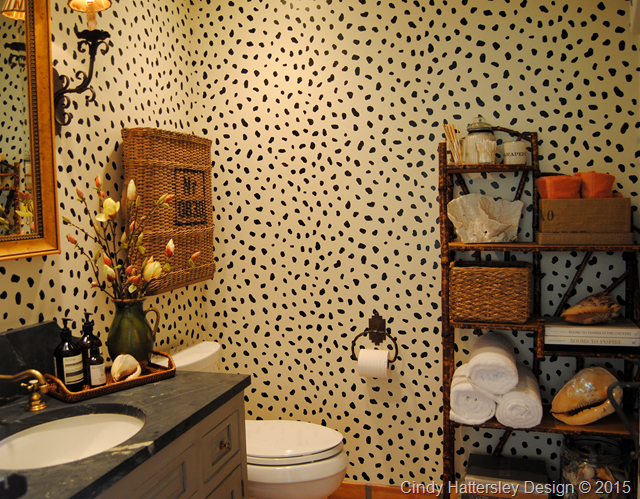
I am embarrassed to show you my former powder room. It was stuck in the 80’s. The walls were glazed. They actually were not the peutrid color they appear but much more subdued. I had stenciled a little border about 20 years ago. We didn’t want to spend a lot of money on the update so we made do with painting , redesigning the existing vanity, and replacing the top.
We are stuck with the saltillo floors. They are all over the main floor of the house. The TP holder was made by local artisan James O’hare. James has now passed but had such a big part in the construction of our house we cannot part with many of the treasures he made for us. The existing vanity had the original mexican tile so popular at the time we built our home over 25 years ago. Note the Newport Brass Oil Rubbed Bronze fixtures. They have a “living” finish. If you ever order anything oil rubbed bronze and they tell you it has a living finish run don’t walk to another collection. “Living”” means it will rub off.
The vanity had a disgusting finish that I thought was lovely at the time. The iron mirror had to go and will appear at the barn sale May 9th.
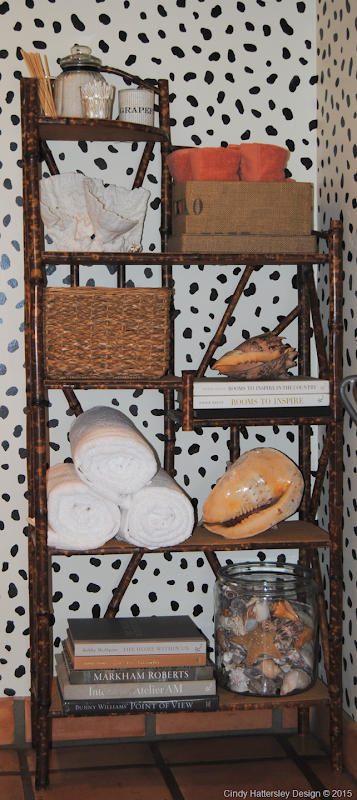
The powder room is very small and I never quite knew what to do with it. When I found a bamboo shelf for $30 at a local junk shop,the transformation began.The powder bath is right off the kitchen/family room so I wanted it to reflect the same feel as that area.
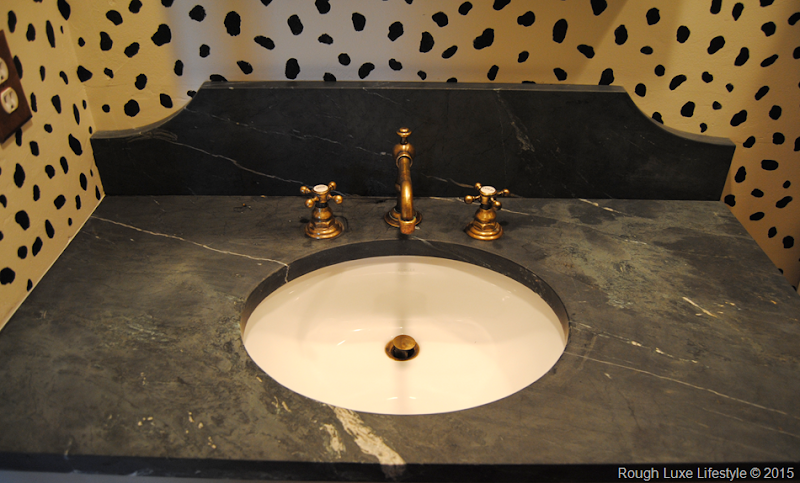
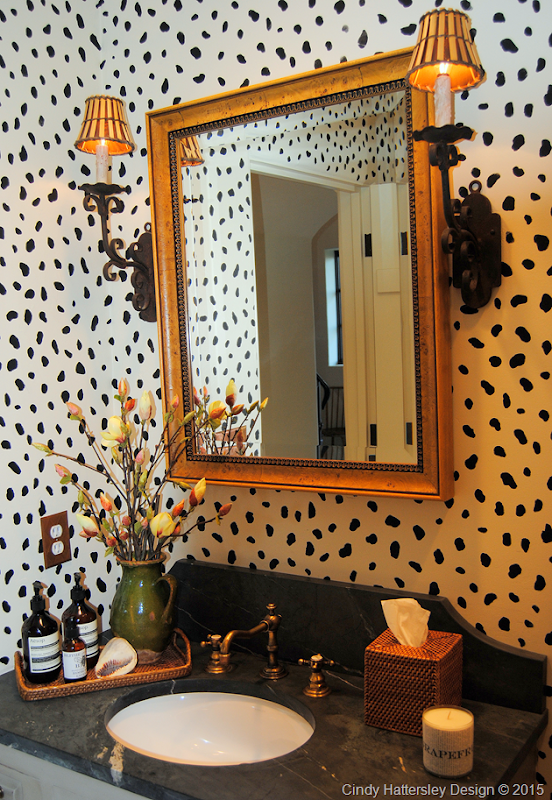
We had a small piece of soapstone left from a job, so we had our fabricator Monterey Bay Marble and Granite fabricate the back and top. I am crazy about the soapstone. We got rid of the painted mexican sink and added a simple white Kohler undermount. I strippped the fixtures and now they are “au currant” unlaquered brass. I got the hairbrained idea to stencil the walls from my friend Pam from Simple Details. Like her I purchased my stencil from Royal Design Studio. Pam made it look “simple” here http://simpledetailsblog.blogspot.com/2014/02/foyer-revealunexpected-pizazz.html I hadn’t stenciled in 20 years so it took me an eternity!
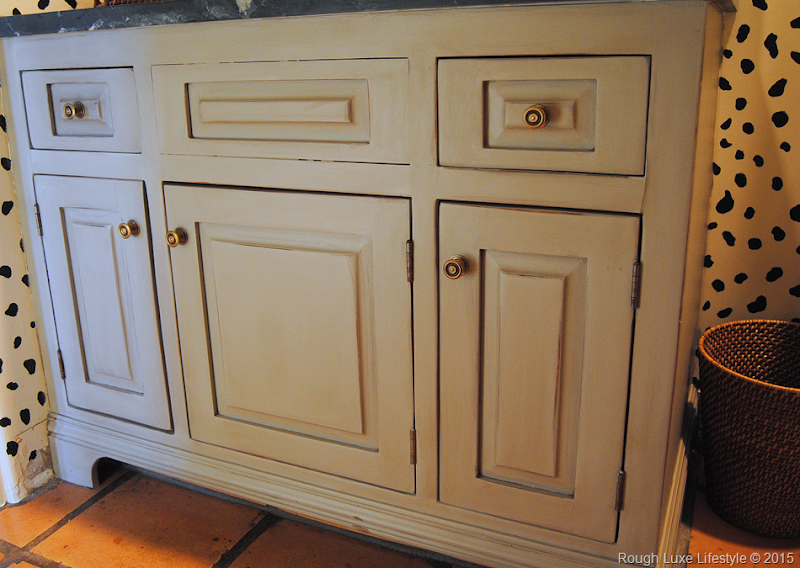
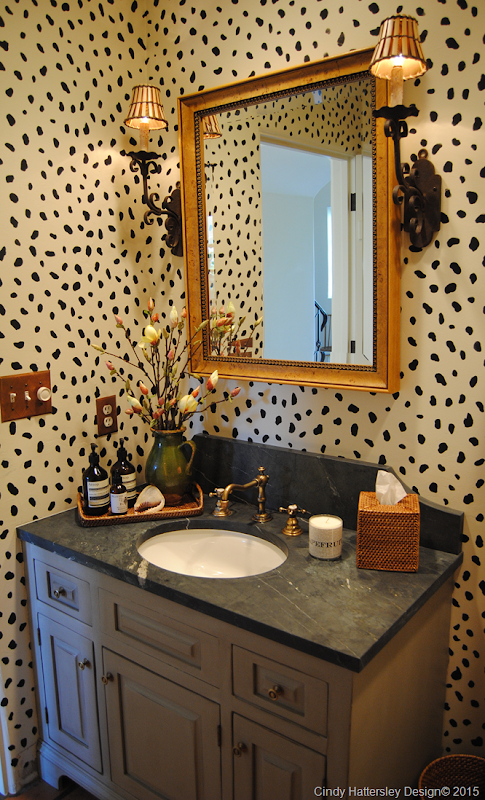
Steve fashioned a bracket base for the vanity to make it look more like a piece of furniture.
I painted it gray , distressed it a little bit (since it already was) ,and did an ever so slight glaze over it. Ignore the missing baseboard on the left.
This picture is a more accurate representation of the color. We replaced the iron pulls with these from Horton Brasses. They are a great resource for reproduction hardware by the way.
I switched out the iron mirror for this frame I already owned in order to tie in the bamboo shelf. I added the bamboo shades to the existing iron sconces.
Here is the $30 bamboo shelf that I found at the junk shop.
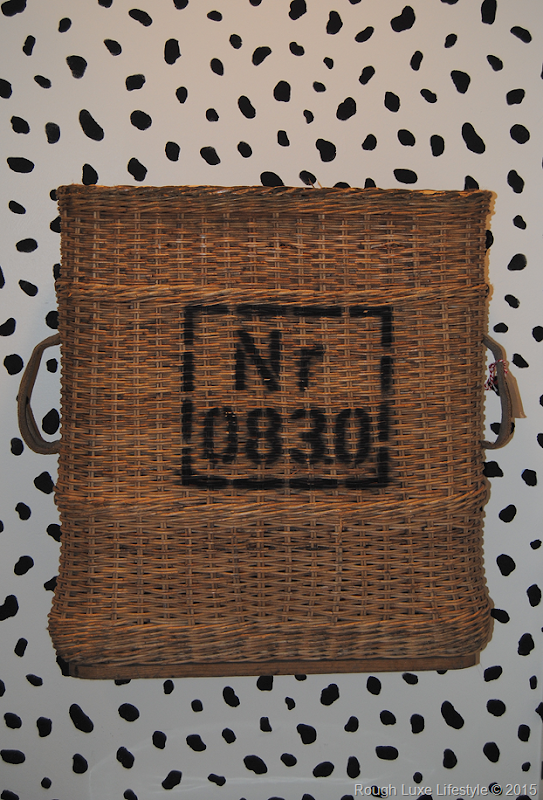
Once the walls were “spotted” they didn’t need much to dress them up. If you follow me on Instagram you know that I found this great artillery basket at the Alameda Flea Market a while back. Here it is above the loo. I always find that area a challenge. Who wants to look at the toilet?
The finished product.
I apologize for the pictures. It is really difficult to get good pictures of this bathroom since it is so small.
Sometimes working with what you have , rather doing a complete overhaul can be just as
rewarding as starting from scratch. Our only expenses were a new sink $125, fabrication of the slab, a new beveled glass mirror , bamboo shades, the $30 shelf and the $120 artillery basket. Of course it helps to have a contractor husband!!
I am joining my buddy Kris from Driven by Decor http://www.drivenbydecor.com/2015/04/april-2015-best-of-the-nest.html and her friends Jennifer http://www.dimplesandtangles.com/2015/04/ and Lisa http://www.shineyourlightblog.com/ best-of-nest-link-party-april.html for their best of the nest linking party. Click on the link below to see what all these clever ladies and their readers have to share




Hi Mary
You can purchase a piece of baseboard (this one is 5 1/4" ) at home depot or your lumber yard. Dray the design you want and attach to the base. It creates the illusion of a piece of furniture. You can do this same treatment to your kitchen cabinetry as well. Feel free to email me if you want better pictures!
LOVE IT!!!
Hi, Can you give a little more detail on the bracket base for the vanity? My cabinetry was all done in the 1990's so I have a deep kick area but want to add molding or whatever is used to make the bottom fronts look like furniture. Is it a piece of trim molding added to the bottom of cabinets and then the piece that looks like legs?
thank you.
Love the soapstone with the interesting backsplash detail.
Cindy – wow! I can't believe this wasn't a gut job – it looks so different and spectacular! The PAM treatment on the walls in so great in here – fresh and fun, and I just love the bamboo shelving unit you found!!!! And also….the stripped faucet, what? That is awesome! And….the soapstone!! We are getting bids on our kitchen remodel and every designer and builder is trying to talk me out of soapstone. But it is so glorious. I am glad to hear you love it. The detail on the backsplash is so custom and subtly beautiful. Love everything you did in here!
How did I miss this post??? I saw the stenciled walls on IG and kept waiting to see the finished room. You are amazing. Love every single thing about your new bathroom from the walls to the artillery basket to the soapstone, etc. etc. And I need a tutorial on stripping the fixtures please (how the heck do you do that?). Amazing what you did for such little $$$.
Love it and I want one of those artillery baskets.
Kim I love mine I hope you can track one down!!
I love it! I cant believe you found that bamboo piece for $30.00…did you notice how expensive the bamboo pieces were at Round Top?
Yes I did!!!
HI!
I MUST SAY I LOVE EVERYTHING YOU HAVE DONE!
I HAVE A MARBLE SPLASH QUITE LIKE YOURS IN MY POWDER ROOM! I ALSO HAVE SALTILLO FLOORS THAT WE BUILT WITH THE HOUSE AND I ADORE! (smaller grout lines; different pattern..but I adore all saltillo floors! LOVE LOVE!!)
I LOVE LOVE LOVE OUR HARDWARE (DOOR HARDWARE) THAT STARTED OUT AS "OIL RUBBED BRONZE" (A 'LIVING FINISH") Before you tell everyone to "run away" from living finishes…..I hope you will listen to another view! We built our house 18 years ago. Our door hardware (levers and locks on doors throughout the house) is "oil rubbed bronze"! We LOVE IT!! The finish does "rub off"; and it is meant to!! The doors we use most are brass that shows through; and the ones we don't use so much….retain the "old bronze finish"! Many people who see our house for the first time comment on how it "feels old and lived in"!
I would just like to add….even though you did not like the "oil rubbed bronze" fixtures that you selected…..and you now like the "unlaquered brass" ones; I recommend "living finishes" always to my clients….it is the "lacquered finishes"! that are most disappointing in the end! Most people do not know that all plumbing fixtures (faucets, drains, etc) are brass. The nickel, chrome, bronze are all finished onto brass.
so….you are paying extra for the fiinish!
I think your faucets in the powder room look lovely in "unfinished brass" now; I just want you to know that I admire and love the "living finish"of oil rubbed bronze you picked out in the first place!! LOVE LOVE LOVE!!!! Again; Please don't chase people away from "living finishes" You now have one: unlaquered brass!! That is now available as a "living finish"! Thank you!!!!
Ha! I left my sink fixture "living" for years. All of the hardware in our home was hand forged by a local artisan. That is a living finish that I love. I think different companies' finishes vary as well. I love anything that has patina so I totally understand what you are saying! It is always great to get another opinion!! I certainly agree about anything laquered..yuk!
LOVE! The new counter and your stripped faucets are beautiful!
Thanks Michelle!!
Cindy, it is beautiful powder room and I love the basketry and bamboo textures it adds to the space, The walls, adore!!
Thanks so much for the inspiration!!
xoxo
Karena
The Arts by Karena
Artist Nathaniel Galka
You know I am big on texture Karena!!
Fantabulous!
Love the transformation!!!
Thanks Terre
What a difference, Cindy and all of that from a $30.00 find…love the bamboo shelf and can't get over your stenciling…it's fabulous! Happy weekend!
Don't look too close Kristy!!!
Pretty awesome redo! Isn't it amazing how time changes our opinion about almost everything? I have a really small bath in the highrise that is stuck in the 1960's. Seriously challenging, but you've given me inspiration. WooHoo !!
I guess we need to get with it Marsh!!
WOW Cindy, it's absolutely perfect!!! I love how it flows with your other rooms, and is so unexpected! You did a fabulous job updating that room on a budget, I love the fixtures now, too! Thanks for the sweet shout out friend! 🙂
You are my guru!!
Cindy,
I love the new look to the guest bath. I'm even inspired to do my Newport Brass oil rubbed bronze set, which right now looks exactly like your "before" pic. My set has done what yours had and its the same model. I love the stenciled walls as I've appreciated the wallpaper that is the same pattern. This is great. Did you use Annie Sloan or some kind of milk paint of the vanity? Our vanity is stained and I've never liked the way the stain turned out color-wise. This is great inspiration, thank you!
Karen
I hope yoy got my email Karen!!
Stencil, wow! I would have sworn it was wallpaper. Love the walls and that soapstone is fab!
I am crazy about that soapstone!
Don't be embarrassed you should see my out door bar area- yikes! I love the room now its so much fun that stencil is adorable and I love the gray vanity it looks fabulous!!
Sadly there are other areas that look almost as bad..or worse! I am trying to get the main floor updated before we sell…
I LOVE it. What a huge difference!
Come on over and check it out!!!
Hi Cindy. Well I see you have been very busy too. The Powder Room transformation looks fantastic! May I ask, what did you use to strip the Oil Rubbed Bronze finish off of your fixture? Love it!
Plain old water rinseable stripper from HD and fine steel wool!
oh my cindy, this is so attractive! really love every touch you added. now i want to recruit my steve for duty (have 3 baths to do). i will however but the wallpaper that looks exactly what you did with the walls, my lack of patience would have disastrous results
beautiful!!
debra
Uh Debra…we are cut from the same mold…you could do it if I can!!
Looks fantastic. I recently redid a powder room and still nothing hangs above the loo I hear you!! . I guess i'm waiting on an inspiration or the right item to distract from the loo- we are so funny!! My bathroom makeover began with a $15.00 bamboo mirror score at Goodwill.Your shelf is fantastic! And I loved pam's stenciling and your walls look fab. Worth every minute!!
Pam is the bomb when it comes to Craigslist! Darn that loo area is tricky!!
Cindy, your stencil really opened up the room. It seems so much bigger. I am a huge fan of bamboo. I hope you share how you stripped off the oil-rubbed finish of your faucet. Great job!
I will do that in a future post Jennifer!!
Stunning transformation. I'm really in ahhh of your keen eye for shopping bargains. I can't believe you scored the shelf for $30. $30???? I'm treasuring hunting bright and early tomorrow! Beautiful space…
Sharon
The House of Hampton
Sharon..it was a miracle that I found that shelf…trust me…
Oh my word, I love the makeover. It looks amazing. Love the dot wall and the gold touches, such a pretty bathroom. Doesn't even look like the same space.
Thanks Mary!!!
I am speechless…it looks GREAT!!! Wonderful job. I like how you did the back splash…need to pin and copy that!
And love the bamboo shelves. So pretty. You must be happy.
I am happy to have it finally completed!
Cindy I saw this stencil used at Pam's blog too and actually bookmarked it. Hahaha and of course, love your bamboo piece –it all looks so wonderful together. I'm so glad you had that piece of soapstone leftover its fabulous with the new shade on your vanity. I love your style.
You know I love yours as well!!!
Oh Cindy, such a look, yes I've seen the splatters, dots and distorted dots appear here and there for a few years now and love the home fashion forward look, your created a master piece room to enter.
Love your living room with the whites and touches of blacks and coral salmons, this is a direction of colour I want to head in… Adding a bit of black real soon after my buying trip to the Interior design show room for designers in LA. I am working on a model home at the beach So. CA.
I am going back now to study your spaces a bit more 🙂
Xx
Dore
I hope we get to see your lovely model home on the blog Dore!!
Unbelievable!!! Looks like it cost quite a pretty penny!!!! Love it Cindy, thanks for the tips for high-end style on a budget!
You are so sweet Vel!!
Hi Nancy
I put it in a bucket with good old water rinsing stripper. Grab some steel wool and wear thick rubber gloves. I did the same thing to my kitchen faucets. My husband was a little nervous but it was actually simple!
Cindy – You had me at "stripped" too! I gotta try this! Catherine
I am amazed at the transformation! seriously gobsmacked. i'm dying over the soapstone counter. and who knew about a "living" finish? not me although I apparently have it in my house and its been irritating me for years and now it has a name! seriously its a Baldwin handleset, not cheap right, and the finish has rubbed right off. how did you strip yours? because i'm gonna do the same! but first i'm going back to stare at pictures of your bathroom redo.
xo,
nancy
Email me Nancy we can talk!!!