

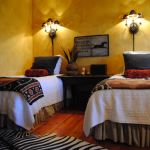
Whew! There is so much going on around here I am not sure which end is up. Meanwhile back at the ranch (er the six week challenge). Things are progressing. Walls are painted Benjamin Moore Manchester Tan at 1/2 strength. The walls look a bit pink in this picture but I assure you they aren’t. I really love the color and those of you who have worked with me know I am not a fan of pink in any form. I may use these wonderful shutters in this room or maybe not…??.

Our house is almost 30 years old and these are the original yellow pine floors now stained dark walnut. Love the color of the floors but boy does Beau’s hair show up!!

These fabulous bird prints from Spicher and Company arrived today and I am absolutely in love with these and many others from their website here https://www.spicherandco.com/home.php. I will do a longer post on their fabulous stuff soon. You can’t tell from this picture but the frames are wonderful as well.

Bedding is here and curtains are being constructed.

This beauty is going to get a paint job along with the other wicker chair. I am still toying with the color??? I am still open to suggestions!

I have a pair of these and they are going to become lamps magically at the hands of my wonderful husband. Oh boy does he have work to do!! You can make your own with a lamp kit like this from home depot or your local hardware store.
Materials and Tools:
decorative object to be used as the base
drill with a long 3/8-inch bit
block of wood (which will be painted same color of baluster)
four wooden button caps for lamp base
wood glue
threaded lamp rod with nut and bolt
lamp kit, including lamp cord, socket and harp
hacksaw
screwdriver
file
utility knife or wire strippers
lampshade


1. Drill a hole through the center of the item you’re using as a base.In this particular case you need a long drill bit.You will also need to drill a hole in the block of wood as well.
2. Stain or paint the wooden button caps to match your base. Glue the button caps to the bottom of the base. This will raise the base and allow a lamp cord to pass under it.
3. Using a hacksaw, cut the lamp rod to the desired length and file off any rough edges. Thread the lamp rod through the bottom of the decorative object and wooden base. Use a washer and nut to secure the rod from the underside of the base.
4. To make the lamp cord easier to thread through the rod, place masking tape around the end or the cord. Then thread the lamp cord through the lamp rod from the bottom of the base until you have about 5 inches of cord sticking out of the top of the rod.
5. Thread the socket components onto the lamp cord in this order: the lock nut, the neck, the harp holder and the socket cap. Be sure to screw the socket cap onto the rod securely; this is what holds all the other parts in place.
6. Pull about 2 inches’ worth of the lamp-cord wire apart. Use a utility knife or wire strippers to strip off ½-inch of insulation from each wire, being careful not to cut the wire.
7. To prevent the wires from being pulled back through the lamp rod, tie a knot by making a loop with each end of the wire. Hold the end of one loop in front of the joined cord and the other loop behind the joined cord. Pass each end through the loop formed by the opposite wire and tighten the knot. To be sure the knot is secure, pull on the plug end of the lamp cord.
8. Attach the wires to the socket. To make sure there are no frayed ends, twist the strands of the exposed wire in a clockwise direction. The neutral wire, which is usually ribbed, is connected to the silver terminal. The hot wire is connected to the brass terminal. Bend the wire around the screw in the same direction that the screw will be turned and tighten.
9. Tuck the wires down and fit the socket cap in place. When the socket cap clicks, the connection is secure.
10. Add the harp and a lampshade.
Here is a picture of a similar lamps that we made for our lake house. I can’t show you our finished product because I haven’t chosen the shades yet!

I have toyed with several different shades but I think I am going to go with either the Target burlap shade

Or the “fancier” Target Nate Berkus designed linen shade. I am leaning toward this one.

So hopefully everything will be semi complete for the unveiling in a couple of weeks! What was I thinking of when I decided to do this by the way? Don’t forget to stop by Linda’s blog here http://www.callingithome.com/ to see what all of the other participants are up to. If you missed my first post of this series you can start here https://cindyhattersleydesign.com/2013/10/one-room-challenge-guest-bedroo.html.


Wow. How nicely you are making lamps. The methods through which you are making lamps is really impressive. I am very interested to decorate my house with lamps and i continue visit your website for that.Click Here
Cindy, I love the second shade. Everything is looking great!
xo, Lissy
I understand that over commitment thing…but it is all looking sooo good. Can't wait to see the final reveal!
Wow great job Cindy I am loving your "new" lamps so much. Can't wait to see more!
xoxo
Karena
2013 Designer & Artists Series
This is so exciting to see!! What progress you (and company) have made, and it is fitting together so well. The pine floors stained walnut are now so much richer, and a great grounding for your other elements. I am in love w/those shutter doors. You know, years ago, in a buying trip to Morocco, I found an entire window…with Hispanic/Moresque old ironwork grille, framed with the original wood surround, w/a pair of hinged shutter doors, all intact. It made a wonderful wall piece, as one could open the shutters to simply expose the ironwork against the backdrop of the wall. Shutters such as these have so many possibilities. The idea of hinging & setting within a frame simply as wall decor…maybe hinging open to reveal some treasure inside?
Those shutters are gorgeous, hope we get to see them! What a great idea for custom lamps, your bases are beautiful ~ need to add that to my diy list! Have a wonderful weekend!
I love the pieces and parts. I don't know what your color scheme is, but I like the wicker chair as it is now. Beautiful shutters. Love the bird prints too. Spicher's is a great resource.
Hi Cindy, I can already tell it is going to be gorgeous. Love your lamps and I am going to check out Spicher's website now.
Have a great weekend!
Phyllis
Love your vision for this room….its going to look great…so really…how hard is it… to make a lamp without a handy husband?
looks like everything is coming together. I'm looking forward to what you do with the chair color as I've been thinking of painting one similar to that.
Looks like things are coming along! I hope you use the shutter! It looks so charming. Love the color of your floor stain!
I'm loving the lamps! Looking forward to seeing the final results too. So far, I'm impressed….
Sharon
@novaraway